Display to header level
A good trail can transform a space into a community destination, but good trails don’t just appear on their own. They require careful planning and a keen understanding of the site. Proper design and maintenance can reduce impacts to surrounding natural resources, increase the longevity of infrastructure, and create a positive experience for users.
Good trails just feel right, like they’ve always been there, as part of the surroundings. They draw visitors forward and show them interesting places but keep them wondering what’s around the next bend. They offer warm sun and cool shade. They let us roam wide open spaces and discover the hidden places in our natural world. They make users work a little, but not too much, providing a workout or a connection with nature while still allowing for an enjoyable walk or ride. A good trail can transform a leftover space into a community destination.
But good trails don’t just appear on their own. They require careful planning and a keen understanding of the site. Well planned trails will have considered not just potential uses, users, routes and destinations, but also how those users will feel when they’re on the trail. During the planning phase, designers should ask questions like:
Good trail planning considers all these human elements. It’s hard to describe how to know exactly when a planned trail will be in harmony with its surroundings, or what kind of emotions it will evoke from a user. For these reasons, local communities may wish to engage a landscape architect or other trail professionals when designing new trails. Natural surface trails would be appropriate additions to most sites which also require stewardship of natural features. If a community wishes to install paved trails, they should consult with design professionals, including landscape architects and engineers.
The following suggestions should help in planning for interesting and harmonious natural surface trails.
Designers should plan trails to…
… offer variety in every form possible – terrain, slopes, views, surroundings, and effort.
… follow irregular, or “natural”, shapes and lines, avoiding perfectly straight or consistently arced segments.
… incorporate playfulness and rhythm, drawing users on along a comfortable path.
… provide a sense of safety and a clear path.
… provide places for rest or respite, like benches, large rocks or fallen trees, or simply flat sections for an easier walk.
... offer opportunities to explore and discover points of interest and other features along the way.
Harmonious trails must account for the feelings of the user and be made to fit within the surroundings of the site. But in order to establish a harmonious trail, the designer must also consider the existing natural and man-made features on the site. Correct interpretation and design in response to existing slopes, soils, drainage patterns and other existing conditions will determine whether a proposed trail will be sustainable or will face a lifetime of maintenance issues.
Trail designers should follow these suggestions for designing trails which will be supported by existing features, rather than conflicting with them.
Designers should plan trails to…
… account for the soil types existing on site. Loams are typically best suited to supporting natural surface trails. Where trails must pass through other soil types, they must be designed to deal with the issues associated with each of these soil types, including drainage difficulties with clay, erosion of silt, the lack of compaction of sand, and the difficulty in shaping rock.
… follow the contour lines, rather than running perpendicular to them. Trails should never go straight up a steep slope and should follow two basic rules of thumb:
~ The Half Rule – the slope of a trail should not exceed half of the slope of the hillside it traverses;
~ The 10% Rule – the average running slope (slope of the trail parallel to the direction of travel) for the length of a trail should not exceed 10%;
… connect people to important, beautiful or otherwise interesting places, such as historic resources, gathering spaces, recreation areas and natural features like rock outcrops and resilient forest communities, while avoiding sensitive communities, rare species, and attractive nuisances.
… respect private properties, stay away from backyards and busy roads and embrace places of interest like downtowns, parks, regional trails and neighborhood connections.
Well-designed trails account for human feelings and perceptions and respect and respond to the surroundings. During construction, proper trail building techniques and sometimes infrastructure, must be implemented to create trails which are sustainable as well. The following technical aspects of design and construction should be considered.
Well designed and constructed trails should…
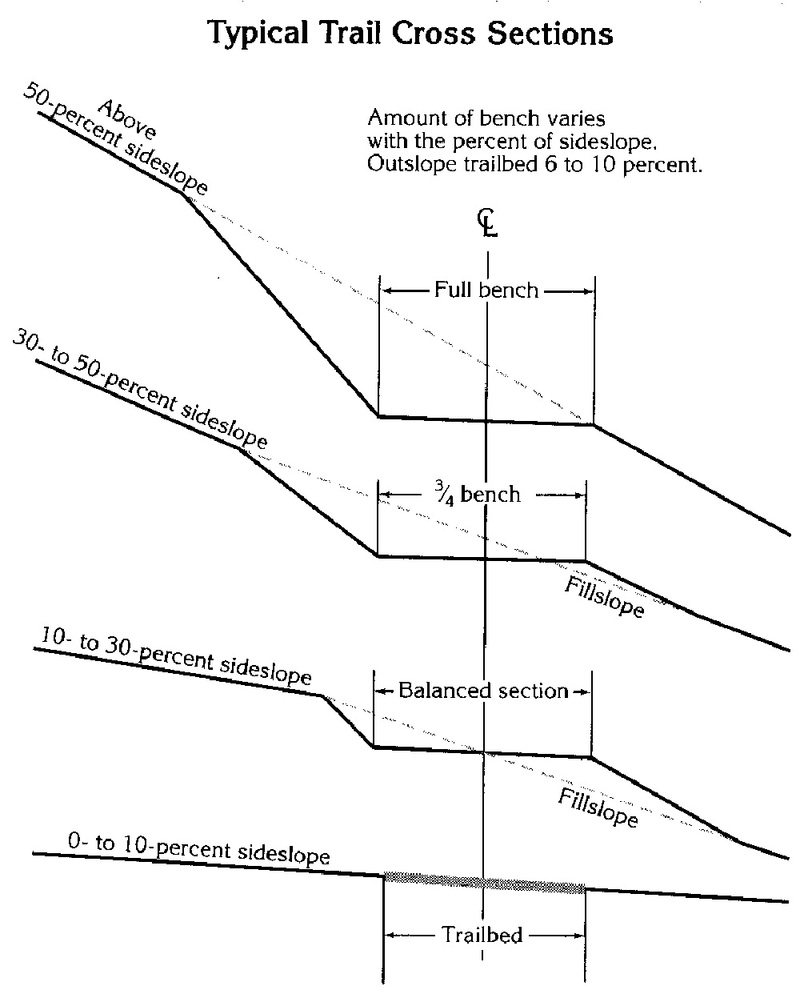
… be constructed with an outslope of 2–5%, facilitating drainage while providing a comfortable surface.
… be cut into a hillside with a full bench, meaning that the trail should be built into the excavated hillside, not built out from the hillside.
… utilize grade dips and other sustainable stormwater management techniques, rather than waterbars, which require continual maintenance and often fail.
… employ switchbacks or climbing turns when traveling up a steep hillside. These techniques typically require careful design of grading, vegetation removal, and features such as anchors and visual goals. If switchbacks or climbing turns are necessary, consult with a professional trail designer.
… utilize structures such as bridges, puncheons, and boardwalks to cross large wet areas, in accordance with all local, state and federal regulations regarding streams, floodplains, wetlands, and hydric soils.
… utilize stabilizers such as rock armoring, to address smaller wet or erodible areas.
… meet the requirements of the Americans with Disabilities Act (ADA), available at www.ADA.gov, whenever possible, remembering that requirements related to recreational trails are less stringent than those for sidewalks.
…provide greater access for people with limited mobility or other disabilities, while using versatile, naturalistic materials, which can fit in with the surroundings while meeting the diverse needs of users.
Trails which are well thought out and carefully constructed, in accordance with the principles above will be more sustainable and require less maintenance over time. They will also be in harmony with their surroundings and provide a great user experience. By implementing sustainable natural surface trails, communities will improve their parks and open spaces and provide their residents with beautiful places to connect to nature, recreate, and exercise.
Constructing good, easily maintained trails and their associated structures is somewhat complicated. The basic concepts are described below, with additional resources included at the end of this chapter.
When rerouting an old trail or establishing a new trail, the general alignment should be walked and flagged to determine exactly how the treadway should wind and dip, which rocks should be removed, and which trees might need to be cut. This is a critical step in the trail building process, as slight shifts in the alignment can significantly affect drainage and tread durability.
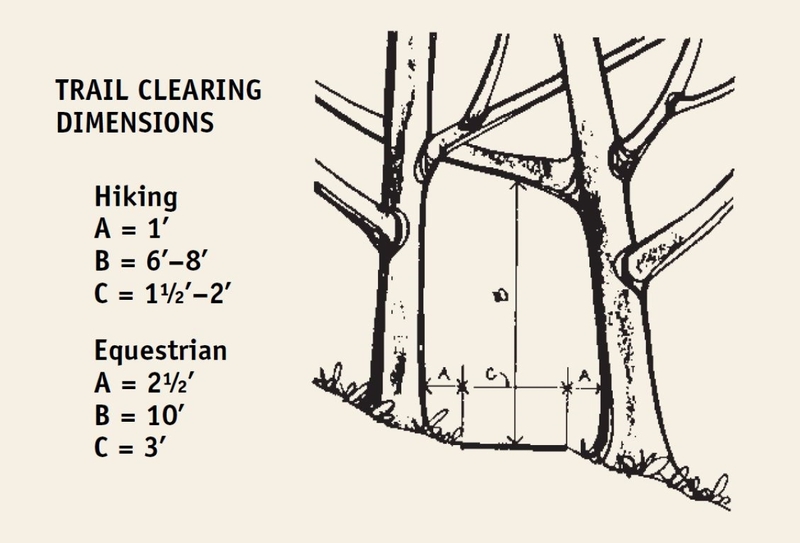
After the precise location of the trail is determined, the tread should be cleared. For hiking trails, an 18–24-inch wide path should be cleared with all projecting limbs cut back an additional 1 foot. For equestrian trails, a 3-foot-wide path should be cleared with all projecting limbs cut back an additional 2½ feet for a total horizontal width of 8 feet. The trail should be cleared to a vertical height of 6–8 feet for a hiking trail and 10 feet for an equestrian trail.
Shrubs, vines, low-hanging branches, blowdowns, small trees, and fallen logs should be removed from the path. Logs and rocks can be used along the trail edges and as anchors and points of interest. Shrubs and small trees should be cut flush with the ground surface. Care should be taken not to disturb the ground surface or to pull plants out by the roots as this may cause erosion of the trail surface. Large trees fallen across the trail should be left in place by making two cuts and removing a 4-foot-wide section from the trunk across the trail. If mountain bikers are the primary users, the logs can be notched to provide a flat surface, which both hikers and mountain bikers can climb over. Mountain bikers may enjoy the challenge of the obstacle.
When clearing is completed, cuttings should be scattered adjacent to the trail and left to decompose. It may be necessary to collect the cuttings and remove them where the trail runs through more formally landscaped areas such as along public roads and through suburban developments.
In the first year of a trail’s use, repeated clearing is required to deter continued vegetation growth. In subsequent years, clearing will probably be necessary only two or three times a year. An exception would be in open fields and grassy areas where mowing is required to maintain a clearly visible treadway.
The type of tread surface on trails will ultimately be determined by the rate of use, the terrain through which the trails pass, and the underlying soils. Once a trail has been cleared, it should be inspected to ascertain where special measures should be taken to stabilize the tread. This may include tread compaction, armoring, and installation of erosion control measures. Most problems are likely to occur where a trail traverses steep slopes or wet areas, or where surface water or stormwater flows across the trail.
Where a trail cuts across a slope greater than 10% (1 foot rise for every 10 feet of run), a slightly outsloped tread, meaning that the tread is slightly lower on the outside or downhill part of the trail, should be created by excavating the hillside. The trail should be cut completely into the upslope soil. No part of the trail should be constructed by piling excavated soil onto the downhill edge of the trail as the soil will likely erode away. A trail cut into the slope is frequently referred to as a “full bench” trail.
Switchbacks and climbing turns can be used where the slope is too steep for a straighter trail. A climbing turn is a reversal in direction that maintains the existing grade going through the turn without a constructed landing. A switchback is also a reversal in direction but has a relatively level constructed landing. Switchbacks usually require detailed design of the approaches, landings, barriers, and drainages. Long sections of trail between these turns are usually better than short ones; fewer will need to be built and there will be less of a temptation to shortcut them. Both switchbacks and climbing turns take skill to locate and are relatively expensive to construct and maintain, therefore, every effort should be made to minimize their use when designing a trail.

Like roads and paved trails, natural surface trails typically create stormwater runoff, as rainwater cannot infiltrate through the compacted trail surface. Diverting surface water off the trail and into rain gardens, swales or other stormwater management facilities should be one of the highest priorities of the trail designer. As our climate continues to grow warmer and wetter, severe storms occur more frequently. Heavy rain can damage or even completely destroy trails that have not been designed to properly manage stormwater.
The most sustainable ways to manage stormwater are typically the simplest. Better Management Practices (BMP’s) frequently employ natural systems, like gravity and overland flow for moving water and plants for absorption and encouraging infiltration. Wherever possible, trails should be accompanied by rain gardens and vegetated swales, so that simple grading, like outslopes and grade dips, can direct water efficiently into nearby stormwater management features.
Most trails built in the recent past consider the importance of moving water off the trail surface and employ slopes, dips and other methods to do this. However, fewer actually account for where the water is going. Many simply channel water elsewhere, without providing rain gardens or other collection areas. The erosion problem then simply gets moved to the surrounding natural area, as running stormwater will erode the adjacent forest or meadow as easily as it would damage the trail. Trail designers must account for the modern problem of climate change and severe storms by providing stormwater collection and infiltration areas, or the new trails will do more damage than good.
Waterbars have traditionally been used to move water off of a trail, especially where regrading is not possible. Diagonal rock or log barriers are typically used to divert water off the tread. Even though waterbars have been standard practice in the past, they should be avoided where it is feasible to use some form of a grade dip, where the grade quickly dips then rises to direct water off the trail. By design, water hits the waterbar and is diverted diagonally off the trail. The water slows down and sediment drops in the drain. This sediment often causes a waterbar to fail as it will slowly build up in front of the bar until the water is able to flow over the bar and continue down the trail, rendering the waterbar useless. A good grade dip can be built more quickly, works better, requires less maintenance, and is less obtrusive on the landscape.
Vegetated swales can be installed parallel to trails, to collect water before it crosses the tread. Swales may be used where too many individual flows are crossing a trail, which may result in an uncomfortable terrain with too many grade dips. Swales can collect and move the water to one trail crossing location, or stormwater collection measures, like rain gardens.
Rain gardens, vegetated swales and other stormwater collection and infiltration measures must be planned, designed, and implemented along with every new trail. These BMP’s should be designed to be unobtrusive and blend into the trails’ surroundings. They should be planted with native plant species appropriate for the immediate surroundings. Wherever possible, they should be shallow and wide, rather than deep. They should mimic the surrounding conditions in every way possible. Without them, stormwater will simply flow off the trails and erode the soil near the trails.
Trails should be designed to avoid wet areas. Equestrian trails in particular should avoid small streams and wetlands to prevent sediment and excrement from degrading the water. Existing trails that cross consistently wet soils should be relocated to higher or dryer ground. If it is not possible to move a trail, stepping stones, turnpikes, bog bridges, boardwalks, and bridges may help alleviate the problem, though all are expensive and require ongoing maintenance.
Stepping stones may provide a simple and relatively inexpensive way to cross small streams, drainage swales and muddy areas. The stones should be large, fairly flat on top, and buried such that they rise above standing water, but don’t rock. Space the stones for the average stride, remembering that trails are for children, too.
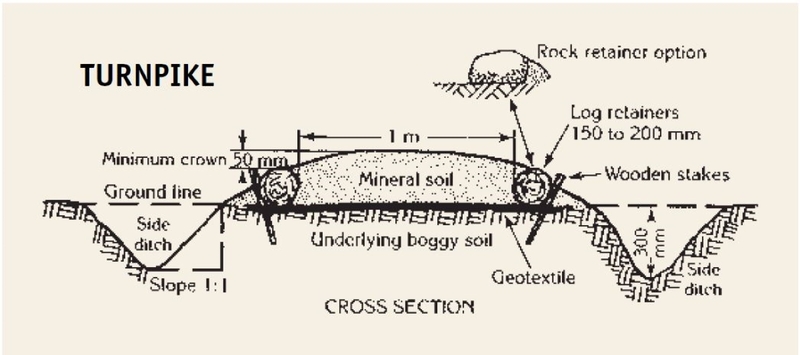
Turnpikes are used to elevate the trail above wet ground. The technique uses fill material from parallel side ditches and from off-site, if necessary, to build up the tread higher than the surrounding water table. The most important consideration is to lower the water level below the tread base and carry the water under and away from the trail at frequent intervals. Turnpike construction is used to provide a stable trail base in areas that have a high water table and fair to well drained soils. Natural surface turnpikes are typically practical up to 10% grades while a paved turnpike is necessary on steeper slopes.
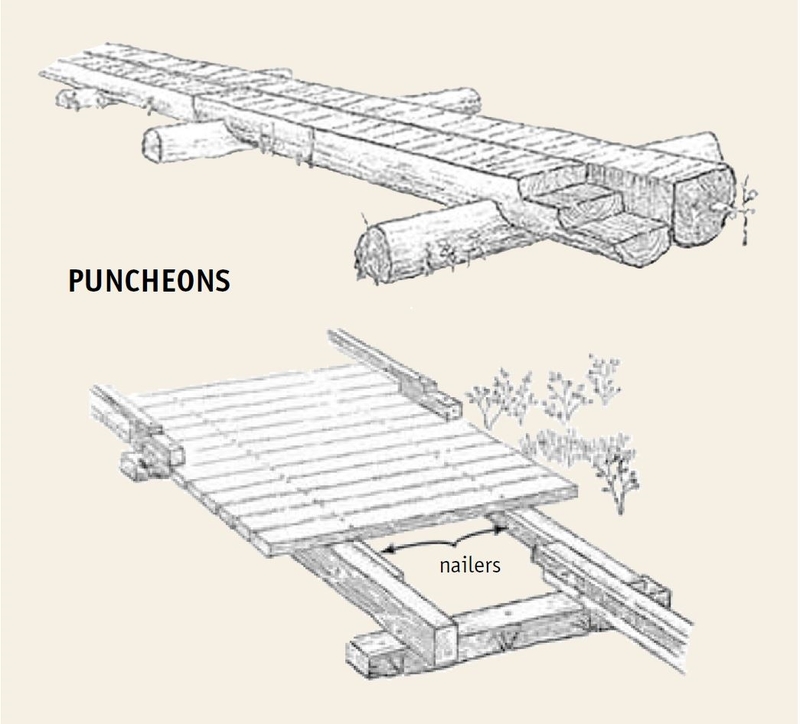
A puncheon, or bog bridge, is a wooden walkway used to cross muddy areas. They can be used where lack of tread material makes turnpike construction impractical or firm mineral soil cannot be easily reached. Puncheons can be supported on muddy surfaces better than turnpikes, which require good drainage. They consist of decking made from flat-topped logs, called stringers, notched into base logs, or mud sills, set into firm ground. If firm footing is not available, use rock and fill to solidify the bottom of the trench they are set in, increase the length of the sill to give it better flotation, or use more sills for the needed flotation.
Puncheons and bog bridges are good low-cost solutions, which are easy to build and install. However, they require long-term maintenance and somewhat frequent replacement. Wood will rot over time, especially in wet conditions. With frequent use, the structures may come loose and become wobbly. They may also sink into the wet soil, or water levels may rise above the height of the puncheon.
Where trails are proposed to cross wetlands, streams or other water bodies, permits may be required. We recommend landowners apply for all applicable local, state and federal permits before installing bridges, boardwalks, culverts, or other crossing methods.
It is important to design and build stream crossings appropriately. Undersized bridges and culverts can cause flooding upstream and severe erosion downstream. Bridges set too low will be repeatedly washed away and potentially destroyed in a flood. Poorly designed or undersized infrastructure can cause significant damage to the stream channel, water quality, and property. Therefore, we recommend consulting with an appropriate design professional when considering installation of major crossing infrastructure.
Additionally, even a simple crossing, such as a ford, stepping stones, or even a wading crossing, need some design. Crossings should be planned in areas with shallow water and gently sloping banks. The rules of thumb regarding trail slopes still apply where trails approach a water crossing. If visitors are led down steep banks, the soil will erode, damaging the banks and adding sediment to the stream. Additionally, taller, steep banks are harder to climb, making it more difficult to leave the stream, potentially presenting a safety issue.
When it becomes necessary to abandon a trail, it should be done effectively and with sensitivity. Restoring abandoned trails to a natural state requires as much attention and planning as constructing new trails. The goal is to reduce the continuing impact abandoned trails have on the landscape.
The best and most effective approach is not to simply close a trail, but to make it disappear. While it is more costly, it is also more effective to completely reclaim the trail corridor. Loosening compacted soil and planting young perennials, shrubs, and trees will encourage nature to take back the trail, eventually absorbing it back into the forest or other surrounding landscape. Regrading would also help blend a cut trail back into its surroundings, while restoring natural slopes.
When a landowner needs to decommission a trail quickly and at a lower cost, the trail may simply be “closed” using barriers and signs. Cut branches or other debris native to the surrounding ecosystem can be dumped at the trail heads, physically blocking access. Fencing may further restrict access. Over time, the surrounding plant community may reclaim an unused trail. However, as long as visitors can see a trail, there is the chance they will bypass the blockades and keep using the trail.
In 1990, the Americans with Disabilities Act set new standards for design and construction, to improve conditions for people living with disabilities and impairments. Now, nearly 35 years later, too many designers and land managers still think of those standards as minimums, boxes to be checked, or even as obstacles themselves. However, we need to think about our facilities in a more modern context, applying a holistic approach to design and stewardship which benefits all users.
“Universal Access” is the preferred approach. Universal Access doesn’t just accommodate people with disabilities, but also improves conditions for everyone. Our outdoor spaces need to meet the applicable Federal standards, but they should be designed and stewarded to welcome everyone, regardless of their abilities.
The requirements of the ADA govern more than just parking spaces and trails. They ensure that people of all abilities have safe, accessible routes between site features, like picnic areas and bathrooms. They set the standards for how bathrooms are laid out, to make sure that people using wheelchairs or walkers can safely use the facilities. They guide placement of signs, water fountains, and other amenities to ensure they don’t constrict accessible routes. They also provide standards for symbols, colors, fonts, text sizes and other design considerations for signs, to ensure that people with a variety of visual abilities can use them. As the guidelines govern so many different elements, it should be obvious that universal accessibility must be incorporated holistically.
Too often, designers hear that a site needs to meet ADA standards, so they propose a wide, straight, paved route, which checks the box. They’ve now provided a trail which meets the standards. But they’ve also probably provided a trail which is boring and won’t be heavily used. If we design for the minimum standards, we’ll leave a large portion of our society behind, at the end of the “ADA trail."
We recommend an alternate approach. Instead of providing one area or trail that is specifically designed to meet ADA requirements, remove the barriers to the rest of the site, and allow individual visitors to choose their own level of challenge. Simply removing some barriers will allow more visitors to enjoy more of our outdoors.
Our outdoor spaces are not governed by the same guidelines as businesses or other public spaces. Recreational trails can still have some slopes, though they may need some flat resting areas. They can be surfaced with naturalistic materials, so long as they are firm and stable. They must be wide enough to accommodate a wheelchair, but most visitors would appreciate a trail to be a minimum of 3’ in width too. Trails and facilities can be designed to allow more users to access a site, while still keeping the character of the space.
Universal Accessibility is not easy to implement at some outdoor sites, but it’s not impossible. We recommend landowners and managers consult with experts and professional designers, like landscape architects, to assist with implementing Universally Accessible design features. It’s important to meet the requirements of the federal standards. Access-board.gov and ADA.gov are two good starting points. But a professional designer is best suited to creating designs that meet the requirements, serve the broadest population and lead to fun and interesting experiences.
Signs can be used to guide trail users and to provide information about features along the trail. Trailhead signage and kiosks provide basic information (e.g., name of property, property map), orient visitors to trail rules and regulations, such as the uses allowed on the trails and the times when the trails are open or closed, and present information about the property and the organization that owns and manages it. The trailhead is also an excellent location for distributing trail maps.
Signs should be designed and placed in accordance with the standards set forth in the Americans with Disabilities Act. Poorly placed signs can become a tripping hazard or obstacle for people with vision impairments. A sign too close to a trail could restrict the passing width, making a trail unable to accommodate a standard wheelchair. Other vision impairments such as color blindness, should also be considered when signs are designed to ensure they are universally accessible.
Along the trail, signage can be used to highlight natural features (e.g., large tree, unique geology), historical uses (e.g., old stone walls) of the property, or to illustrate the complex interactions in natural ecosystems. They are also a good way to inform visitors of ongoing restoration activities—such as riparian buffer plantings—and how it will improve the conservation value of the property. These types of signs are considered interpretive signage. Although there are endless amounts of information that can be communicated on any property, interpretive signage should be: (1) limited in number and (2) concise (if possible, include illustrations or photos to make the intended point more clearly).
Other appropriate types of signage for trails indicate the distance to other locations, points of interest, or improvements (e.g., office, shelters) and inform users where they are leaving the property.
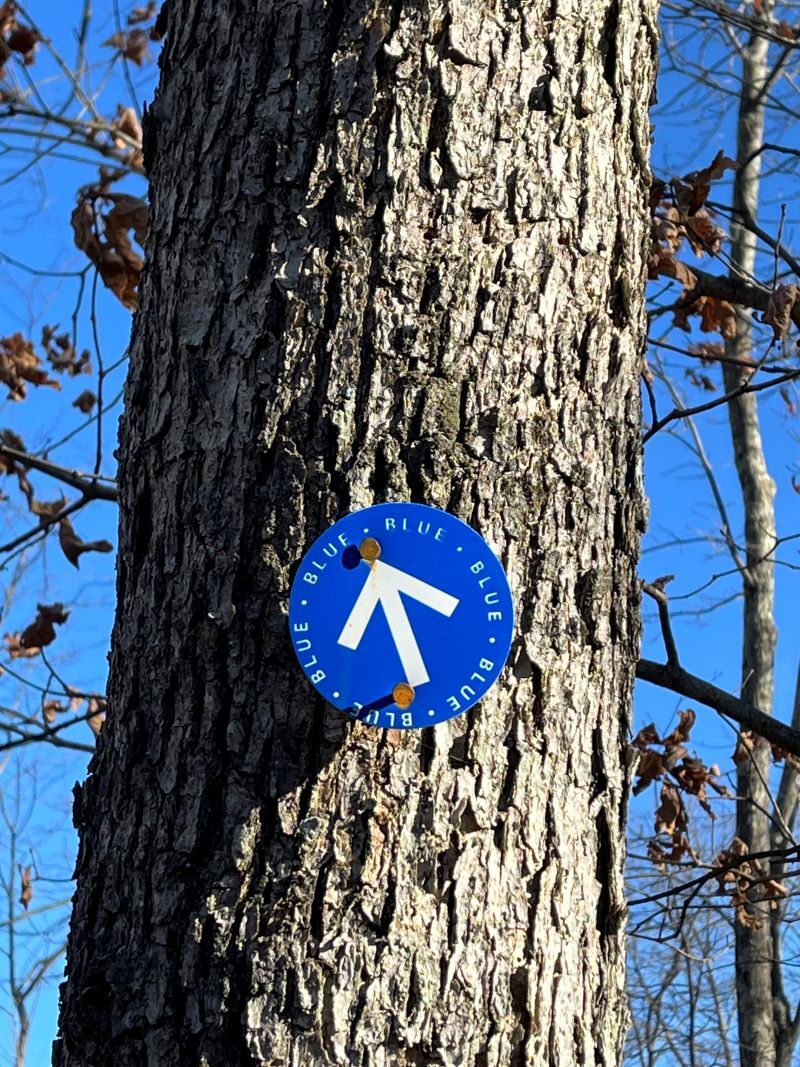
Trail markers include cut or painted blazes on trees; wood, plastic, or metal marker tags; and marker posts. These markers are used to help travelers identify the trail corridor when the treadway is indistinct, the ground is covered with snow, or when the path is confused by multiple trails or obscured by weather such as dense fog. They should be used only when the trail is not obvious, there is a sudden change in direction, and at trail junctions.
As with signage, standards should be developed for marking a trail system. This includes color, placement, frequency, and form of the markers. A common system is to use a primary color for each major trail and to have a standard color for all secondary trails. This enables users to know when they have diverged from a main trail whenever they see that color, regardless of which of the major trails they may be following. Colors considered most visible by experienced trail builders include blue, red, yellow, white, and orange. Keep in mind the use of the trail when selecting a color—white might not be a good choice for a trail used in the winter.
Markers should be placed carefully. They should be as close to the trail alignment as possible and plainly visible when walking the trail in all seasons, preferably without the need for routine clearing of foliage. Eye level is generally considered most effective, slightly higher if the trail is used in winter. Large trees should be used in preference to smaller ones and never use a dead tree. If markers are light-colored, dark trees should be used, and vice-versa. Markers should not be placed on trees or features that are important elements of a view or setting; they should be visible but not mar the visual character of the trail.
The frequency of marker placement is a balance between reassuring, not confusing, the user and maintaining the natural character of the trail. If part of a trail has markers, all of it should be marked, but abrupt changes in spacing should be avoided, as they are confusing to users. Be conservative. It’s better to improve tread visibility than to rely on markers.
The marking decisions should be based on traffic traveling in both directions. Where a trail has a clearly defined treadway, markers should be placed only at points of possible uncertainty. Markers should be clearly visible from any point where the trail could be lost. When a trail turns into or off another trail or road, a double mark should be placed, one directly above the other. Then, after the change in direction, another marker should be placed so that it can be clearly seen from the turning point. Markers should also be placed immediately after road crossings in a location where it will not be affected by street maintenance or snow clearing activities and where it is unlikely to be vulnerable to vandalism.
Trails should be monitored for use and condition to determine if maintenance is needed. Trail conditions will naturally change over time due to use and weather. Proactive monitoring can identify issues in the early stages. Monitoring can also be used to determine where maintenance is needed and to prioritize actions.
Some items that monitors should check for include:
In many cases, monitors can evaluate the trails annually and after severe sotrms. Additional monitoring may be needed if there is significant disturbance, rerouting of the trail, or change in usage. Monitors can use standard forms, either paper or online, to record their observations. Photographs at designated points are also useful for recording the conditions of the trail system.
The Pennsylvania Department of Conservation and Natural Resources’ Pennsylvania Trail Design & Development Principles Guidelines for Sustainable, Non-motorized Trails includes an example monitoring form and description of how to use it.
If a link is broken, try searching on the keyword string preceding the link.
ADA.gov (https://www.ada.gov/, as of 2024)
US Access Board (https://www.access-board.gov/, as of 2024)